
Have you ever wondered why unit tests are never run on MCUs?
Most embedded projects do have some form of testing, but those tests usually run in one of two places.
Some are unit tests run on the host. This is fast and works well for parsers, state machines, calculations, and other code that does not depend on the target hardware. Also, it’s easy to integrate into CI.
The rest are manual tests run on a board connected to a developer’s machine. Those tests are closer to the real system, but they are often difficult to run automatically.
Both are useful, but they leave a gap. Host-side tests do not run in the production environment, while boards on developers’ desks are usually difficult for CI to reach.
On-target unit tests close that gap and are useful because they sit between those two approaches. They are small tests that run on the actual microcontroller and report success or failure like any other automated test suite. With OnMCU, they can run in CI without requiring you to maintain a board farm or self-hosted runner.
In this article, we will describe that workflow using three components:
defmt-testruns the test suite on the microcontroller.- Semihosting sends the final pass or fail status through the debug connection.
- OnMCU provides the physical board and propagates that status back to Cargo and CI.
The test itself is only one part of the problem, though. Compiling and flashing a test binary is straightforward. The more interesting question is how the microcontroller tells the host that the test has finished, and whether it passed. That is part of the “test harness” surrounding and enabling our tests. The most common way how this technical challenge is solved in practice is called semihosting, which provides that missing connection so in order to explain the whole process, we will start there.
#Returning an exit status with semihosting
On a system with an operating system, a program can simply return an exit status. That status is an integer passed to the parent process, often a shell, so that it knows what happened.
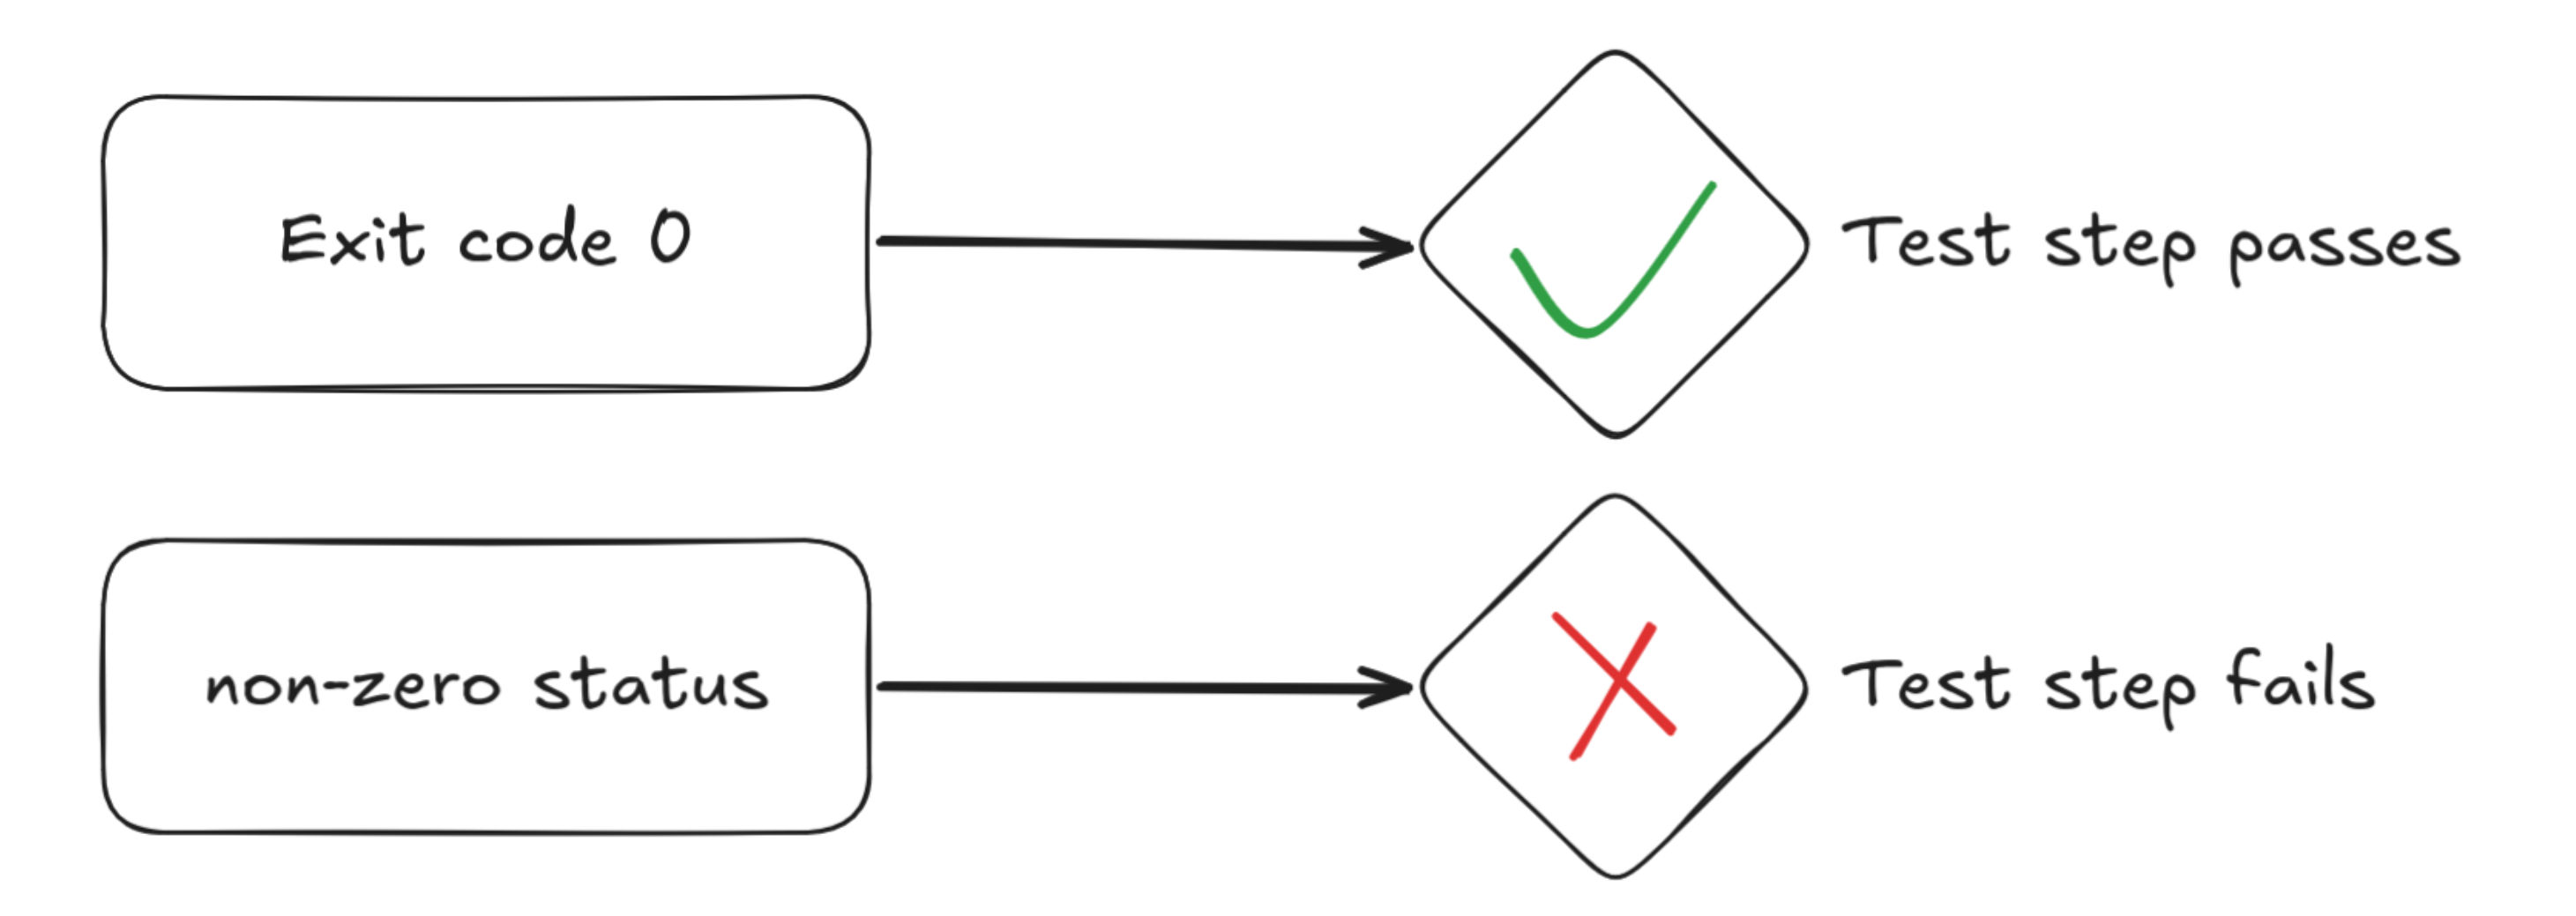
By convention, an exit status of 0 indicates success. Any other value indicates some kind of error.
A CI runner uses exactly this mechanism. It starts a process, waits for it to finish, and marks the step as successful or failed based on the process exit status.
A bare-metal microcontroller has no parent process to return to. Nevertheless, we can achieve nearly the same behaviour using semihosting and the flashing tools we already use.
Before looking at how defmt-test uses this, it is worth understanding what semihosting actually
does.
#How semihosting works
Semihosting is a mechanism that allows code running on an embedded target to use facilities provided by a host computer. For this to work, the host must have a debugger attached to the target.
The target makes a semihosting request by placing information in known registers or memory locations and then halting the processor with a specially shaped instruction. That information tells the debugger which operation to perform and where to find its arguments.
The requested operation might be:
- printing text to the host console,
- accessing a file on the host,
- reading input,
- or terminating the program with an exit status.
The debugger detects the halt, reads the request and its arguments, performs the operation on the host, and then resumes the target when appropriate. If the operation returns data, the debugger makes that data available to the firmware before execution continues.
Arm introduced and specified semihosting roughly 30 years ago, and it is still widely used today. It is also available on architectures other than Arm, including RISC-V. The current upstream specification is maintained in the Arm ABI repository.
For on-target tests, the operation we care about is program termination.
#Semihosting on Cortex-M
The instruction used to enter semihosting depends on the target architecture. Cortex-A, Cortex-R, and Cortex-M use different mechanisms, including breakpoint, halt, and supervisor-call instructions.
Most microcontrollers based on Arm cores use Cortex-M. On these targets, a semihosting request is normally made with a breakpoint with a specific immediate value:
bkpt 0xABThis produces the opcode 0xBEAB.
Before executing the instruction, the firmware places the semihosting operation in register r0 and
a pointer to its argument block in register r1.
To return an exit status, we place the SYS_EXIT_EXTENDED (value 0x20) into r0.
Its argument is a two-word block:
- The reason why execution stopped
- An application-defined subcode
The usual reason is ADP_Stopped_ApplicationExit, with the value 0x20026. When that reason is
used, the second word contains the program’s exit status.
Another possible reason is ADP_Stopped_InternalError, with the value 0x20024.
A minimal C implementation for a Cortex-M target looks like this:
#include <stdint.h>

// Semihosting operations; see the Arm semihosting specification.
#define SYS_EXIT_EXTENDED 0x20
#define ADP_STOPPED_APPLICATION_EXIT 0x20026u

// Issue a semihosting call. The operation is passed in r0 and the parameter
// block in r1. The debugger detects the `bkpt 0xAB` instruction.
static int semihost_call(int op, void *arg)
{
    register int r0 __asm("r0") = op;
    register void *r1 __asm("r1") = arg;

    __asm volatile(
        "bkpt 0xAB"
        : "+r"(r0)
        : "r"(r1)
        : "memory"
    );

    return r0;
}

void sys_exit(int code)
{
    // SYS_EXIT_EXTENDED takes a two-word block containing the stop reason
    // and the exit status.
    uint32_t block[2] = {
        ADP_STOPPED_APPLICATION_EXIT,
        (uint32_t)code,
    };

    semihost_call(SYS_EXIT_EXTENDED, block);

    // The host normally terminates the debug session above. Stay here if it
    // does not.
    for (;;) {
    }
}
We use this in our minimal C example for the NUCLEO-H743ZI to signal a successful run.
The semihosting Rust crate
contains the equivalent implementation for Rust.
#Semihosting on RISC-V
The basic idea is the same on RISC-V, but there is one small difference.
RISC-V does not have an immediate value on its breakpoint instruction. A debugger therefore cannot distinguish a semihosting breakpoint from an ordinary breakpoint by looking at the breakpoint instruction alone.
To solve this, the ebreak instruction is wrapped in two specific no-op instructions:
slli x0, x0, 0x1f  # 0x01f01013: entry NOP
ebreak             # 0x00100073: break to debugger
srai x0, x0, 7     # 0x40705013: exit NOP
The two shift instructions (slli for “shift left logical immediate” and srai for “shift right
arithmetic immediate”) do nothing because they write to x0, which always remains zero. Their
unusual shift amounts make the sequence easy to recognize and unlikely to appear in normal compiled
code.
When the debugger encounters the ebreak, it checks the instructions immediately before and after
it. If they match these encodings, the debugger handles the trap as a semihosting request rather than
a regular breakpoint.
The details differ slightly, but the result is the same: firmware running without an operating system can ask the debugger to terminate the host-side process with a particular exit status.
That leaves one practical question: how does this semihosting status become the exit status of the command running on the host?
#From semihosting to the host process
This is the convenient part: the flashing and debugging tools already understand the protocol.
With OpenOCD, semihosting must be enabled explicitly. A non-interactive invocation suitable for CI might look like this:
openocd \
  -f interface/stlink.cfg \
  -f target/stm32h7x.cfg \
  -c "init" \
  -c "reset halt" \
  -c "arm semihosting enable" \
  -c "program firmware.elf verify" \
  -c "reset halt" \
  -c "resume"
OpenOCD flashes the binary, resumes the target, and waits for a semihosting exit request. Once it receives one, it terminates with the corresponding exit status.
With probe-rs run, semihosting detection is enabled by default. Whenever the core reaches a
breakpoint, probe-rs checks whether it is part of a semihosting operation.
Some operations, such as host file access, require explicit permission. SYS_EXIT_EXTENDED, however,
works without additional configuration.
The complete path is therefore:
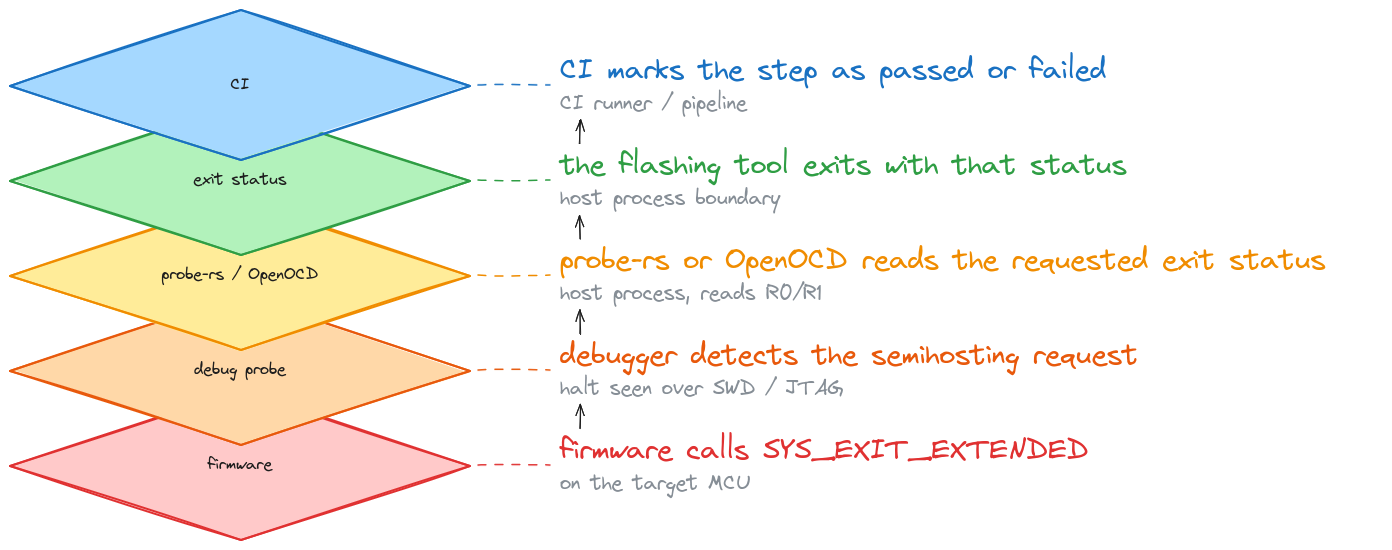
There is no need to search the serial output for words such as PASS or FAIL. The result is
carried through the same process exit mechanism that CI already uses for host-side tests.
Now that we have a reliable way to return a test result, we can look at how defmt-test builds a
Rust test harness around it.
#The test harness: defmt-test
defmt-test is a small test harness for embedded Rust. It
allows tests to run directly on a device while keeping the familiar structure of Rust’s built-in
#[test] system.
To use it, add defmt-test as a development dependency and annotate the test module with
#[defmt_test::tests].
A minimal test for the NUCLEO-H743ZI might look like this:
// tests/hardware.rs

#[defmt_test::tests]
mod tests {
    use super::*;

    #[init]
    fn init() -> State {
        let cp = defmt::unwrap!(cortex_m::Peripherals::take());
        let dp = defmt::unwrap!(pac::Peripherals::take());

        // Enable the CRC peripheral clock on RCC AHB4.
        dp.RCC.ahb4enr().modify(|_, w| w.crcen().set_bit());

        // Read the register back to ensure the write has taken effect.
        let _ = dp.RCC.ahb4enr().read();

        State { cp, dp }
    }

    #[test]
    fn cpu_is_cortex_m7(state: &mut State) {
        let cpuid = state.cp.CPUID.base.read();

        // PARTNO 0xC27 identifies a Cortex-M7.
        defmt::assert_eq!((cpuid >> 4) & 0xFFF, 0xC27);
    }

    #[test]
    fn hardware_crc_matches_software(state: &mut State) {
        let data: [u32; 4] = [
            0x1234_5678,
            0xDEAD_BEEF,
            0x0000_0000,
            0xFFFF_FFFF,
        ];

        // Reload the CRC data register from INIT.
        state.dp.CRC.cr().write(|w| w.reset().set_bit());

        for &word in &data {
            state
                .dp
                .CRC
                .dr()
                .write(|w| unsafe { w.dr().bits(word) });
        }

        let hardware_result = state.dp.CRC.dr().read().bits();

        defmt::assert_eq!(hardware_result, crc32_mpeg2(&data));
    }
}
The #[init] function runs before the tests and returns state that can be passed to each test. In
this example, that state contains the core and device peripherals.
defmt-test also provides hooks for code that should run before or after individual tests or the
complete test suite. Its crate documentation describes the
available attributes.
During the run, defmt-test prints the name and result of each test through defmt. Once all tests
have passed, it terminates the program through semihosting.
If a test fails, the assertion panics. Together with panic-probe, that gives us a decoded panic
message with information about the failing assertion.
The test harness therefore takes care of both sides of the result:
success -> semihosting exit with status 0
failure -> panic reported through defmt
The debugger sees the result and turns it into the exit status of the host-side process.
#Telling Cargo how to run the test
Cargo normally builds embedded test files using Rust’s host-oriented test harness. We need to disable that harness for every test binary that should run on the target.
For the example above, add the following to Cargo.toml:
[[test]]
name = "hardware"
harness = false
Cargo can now build the test as a normal embedded binary. The remaining step is to tell it what to do with the resulting ELF.
Cargo uses the target runner configured in .cargo/config.toml whenever it needs to execute a binary
for that target.
To run the test on OnMCU, the runner can be configured like this:
[target.thumbv7em-none-eabihf]
runner = "onmcu run --board NUCLEO-H743ZI --ignore-trailing-args --file"
Replace NUCLEO-H743ZI with the board required by your project.
After that, the usual Cargo command is enough:
cargo test --test hardwareCargo compiles the test and passes the resulting ELF to OnMCU. OnMCU allocates the requested board, flashes the binary, and runs it.
The same runner configuration also works with editor integrations. Pressing the Run Test button above the test module in VS Code causes rust-analyzer to invoke Cargo, which in turn hands the binary to the configured runner, in our case OnMCU.
Nothing in the test itself needs to know whether the board is connected locally or hosted remotely.
#How OnMCU closes the missing link
Without OnMCU, the machine running the Cargo command would need direct access to a development board and debug probe.
That is manageable on a developer’s workstation. In CI, it normally means setting up a self-hosted runner, connecting the board, keeping the runner online, and making sure each test starts from a known hardware state. When using Docker, it usually requires quite some fiddling around to get USB data in and out of the container. As a result, even when automated, self-built test setups are often unreliable and break frequently.
OnMCU replaces that local setup.
The CLI uploads the test binary and requests a compatible board. On the OnMCU infrastructure, the
binary is flashed and executed using tools such as probe-rs. The logs are streamed back to the CLI
while the test runs.
When defmt-test eventually exits through semihosting, probe-rs receives the result. OnMCU then
propagates that result through the CLI process.
From the CI runner’s point of view, it is still an ordinary command:
The semihosting result therefore travels through every layer without being translated into a separate reporting format:
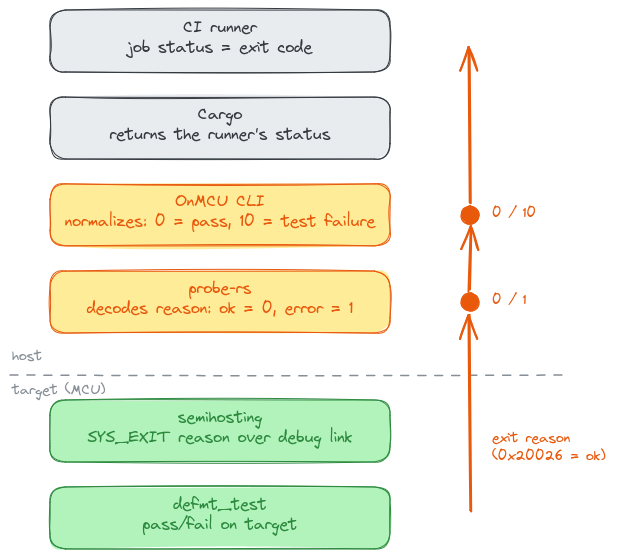
That simple chain is what makes the setup fit naturally into existing Rust workflows.
#Running in GitHub Actions
To run the firmware in CI, build the ELF and pass it to
onmcu/onmcu-action:
name: Hardware
on: [push]

permissions:
  contents: read

jobs:
  run:
    runs-on: ubuntu-latest
    steps:
      - uses: actions/checkout@v4

      - name: Provision Rust toolchain and targets
        run: rustup show

      - uses: Swatinem/rust-cache@v2

      - name: Build
        run: cargo build --release

      - uses: onmcu/onmcu-action@v1
        with:
          board: NUCLEO-H743ZI
          file: /target/thumbv7em-none-eabihf/release/nucleo-h743zi
          api-key: ${{ secrets.ONMCU_API_KEY }}
The action uploads the ELF and runs it on the requested board. The firmware’s semihosting exit status becomes the result of the GitHub Actions step, so no log parsing is required.
#Not just Rust
OnMCU itself is language-agnostic. At the lowest level, the platform flashes a binary, runs it, collects its output, and determines whether the run succeeded.
C and C++ projects can use the same model with Unity, CppUTest, or a custom on-target test harness. As long as the test binary communicates a result that the flashing tool can recognize, OnMCU can pass that result back to CI.
Rust is especially convenient because the pieces already fit together.
defmt-test provides the test structure. panic-probe reports failures. probe-rs handles flashing,
logging, and semihosting. OnMCU supplies the physical board and makes the resulting exit status
available to the CI runner.
For an existing embedded Rust project, moving a test from a board on a desk to a remotely hosted board can therefore require little more than changing the Cargo runner. For a C/C++ project, we have an example Makefile in our C-examples repository.
#Conclusion
On-target unit tests do not replace host-side tests.
Code that is independent of the target should usually remain on the host, where tests run faster and failures are easier to debug. On-target tests are useful for the parts that depend on the processor, memory layout, peripherals, or interrupt behaviour.
They also do not replace working at the bench. Some problems still require an oscilloscope, logic analyser, or direct access to the complete device.
But there is a large space between a host-side unit test and a manual hardware investigation. On-target unit tests fill that space. They run early enough to catch hardware-dependent mistakes before they reach system testing, while remaining small enough to run on every change.
Semihosting is what makes those tests behave like normal programs from the outside. It gives
bare-metal firmware a way to return an exit status. defmt-test uses that mechanism to report the
result of a Rust test suite, and probe-rs turns it into the exit code that Cargo and CI already
understand.
OnMCU extends that same path to remotely hosted hardware. The test still runs on a real microcontroller, but the board no longer has to be connected to the machine that started the test.
Our goal is simple: every commit should be testable on real silicon without requiring every team to build and maintain its own hardware infrastructure.